Technology imitates life. Even in cases when it wouldn’t necessarily have to, it often does. It’s just what comes naturally to both the people making the technology and the people using it. But just because some aspect of technology is functionally similar to what you and I already know and experience every day doesn’t mean it’s immediately obvious precisely how, or how to use it, or even why we’d want to. Port Forwarding is an excellent example of this kind of scenario.
While the name may sound intimidating to anyone not familiar with networking, it actually follows a pretty simple principle, and has a variety of uses such as:
- Improving internet speed (in some cases)
- Running a dedicated game server over WiFi
- Accessing home streaming solutions (e.g. NVIDIA GameStream) from anywhere in the world
- And more!
Sound interesting? Great. But how does any of that apply to a real-world, practical equivalent, you ask? Well, to understand that, think of your house address. Let’s say you live in an apartment. Most likely, all of the apartments in your complex share the same basic address. In computing terms, this is your WiFi router’s public IP Address—it’s how the rest of the internet finds you and the point from which you go out to explore the rest of the internet. But going back to the illustration, this is an apartment complex, after all—it’s not quite enough to have one common address for everyone living there. There has to be a secondary identifier to specify each individual apartment, otherwise mail would just pile up at the landlord’s office, and then it would be up to them to sort everything out and get each delivery to the right place. Without port forwarding, this is effectively what your router has to put up with. Each packet of data that hits your router has a grand total of 65,536 ‘paths’ to sort through to reach its ultimate destination. If the first path the data packet comes to isn’t open, it will try the next one. And if that one isn’t open either, it will try the next one. And so on and so forth it will go down the line of 65,536 pathways until it finds one it can go through to get to where it needs to go. While this process happens in the blink of an eye, depending on what you’re trying to do with the internet the resulting speed can be noticeably slower than if a few key ports are always in line for certain types of data, and in some cases having unopened ports can mean certain types of data can’t get through at all.
So you want to port forward
Fortunately, port forwarding is one of those things that can be broken down into three relatively easy steps. ‘Relatively,’ because while the principles are the same all across the board, numerous little details will vary from router to router and computer to computer. So don’t be disheartened if things don’t look precisely as described. That out of the way, let’s get to it:
1. Obtain your local IP address
Notice the ‘local’ in that ‘local IP address’. Remember the IP address from the illustration? That’s not this one. That’s your public IP address. A local IP address is used by your router and your router only to identify each connected device, be it a PC, tablet, game console, you name it. As far as the rest of the internet is concerned, all that exists is your public IP address—your router. For all other connected devices to send and receive data, they must communicate with that router, local IP address to public IP address to internet, or the reverse process. The pathways connecting your local and public IP addresses are—you guessed it—ports.
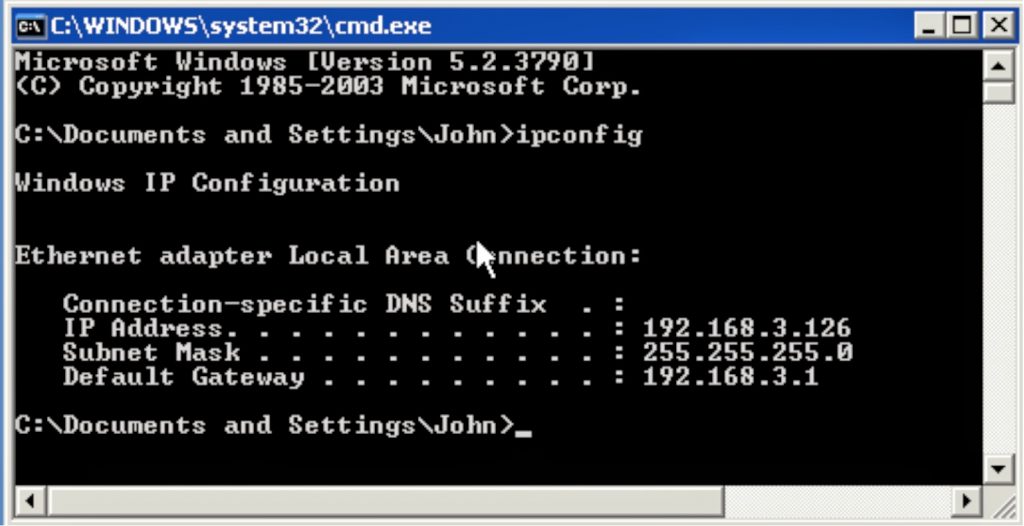
Clearly, knowing the local IP address of the device you want to forward ports to is important. But how do you find it? Well, that depends on the device. In general, look for any kind of network settings and you’ll probably find your local IP address. This will usually come in the form of 192.168.#.# or in rare cases 10.0.#.#, depending on your model of router. On Windows PCs, one sure-fire way to find your local IP address is to search the start menu for ‘cmd’, run the program, and in the window that appears, type ‘ipconfig’. This will produce a lot of statistics, but the one to look out for is the IPv4 address, which should read as described above.
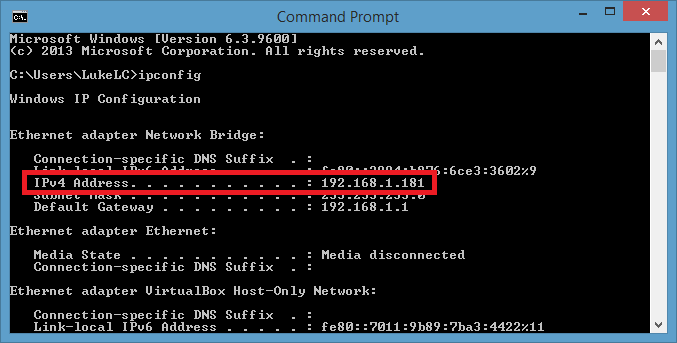
In any case, take note of this number once you’ve found it, as we’ll be needing it in step 3. Have to know where to forward ports to, after all!
2. Obtain the port(s) to forward
Of course, we also have to know which ports to forward. With 65,536 options, taking a crapshoot isn’t likely to yield results. Many common use-cases are standardized so they always use the same port no matter the actual program involved, but when it comes to individual online games or services like Sony’s Playstation Network or Microsoft’s Xbox Live, you may have to do a little hunting to find which ports are used, and therefore need forwarding. For starters, portforward.com is a pretty excellent resource that not only tells you what ports to forward for a plethora of applications, but also how to do it on a wide variety of router models. Ctrl + F is your friend.
For the purposes of this tutorial, we’re going to port forward iTunes for music sharing and Airplay, which uses TCP port 3689. Keep in mind though that this is about the simplest example possible. Don’t be surprised if you run into applications that use an entire range of ports on both the TCP (Transmission Control Protocol) and UDP (User Datagram Protocol) side of things. You don’t need to worry about understanding the difference between TCP and UDP, just use the appropriate ports for each protocol and you’ll be good to go.
3. Forward the port(s)
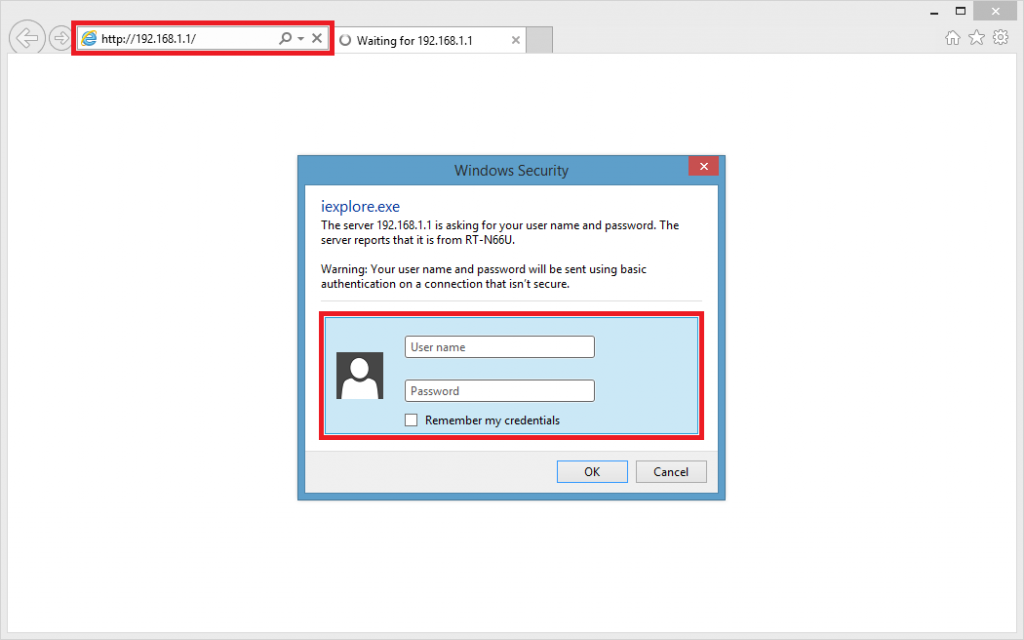
Now that we have our destination local IP address and the port we want to have direct data there, all that’s left is to actually set up the forward. This is done in your router’s configuration panel, which can be accessed on any connected device in a web browser. Only instead of a web address, you’ll need to input your router’s local IP address. This is almost always 192.168.1.1, or in rare cases 10.0.0.1.
But not so fast: you can’t just go waltzing in to your router without a username and password, which you’ll be prompted for upon entry. Check online or in your router manual for these credentials. Usually they’ll be some combination of obvious terms like ‘admin’, ‘default’, and ‘password’.
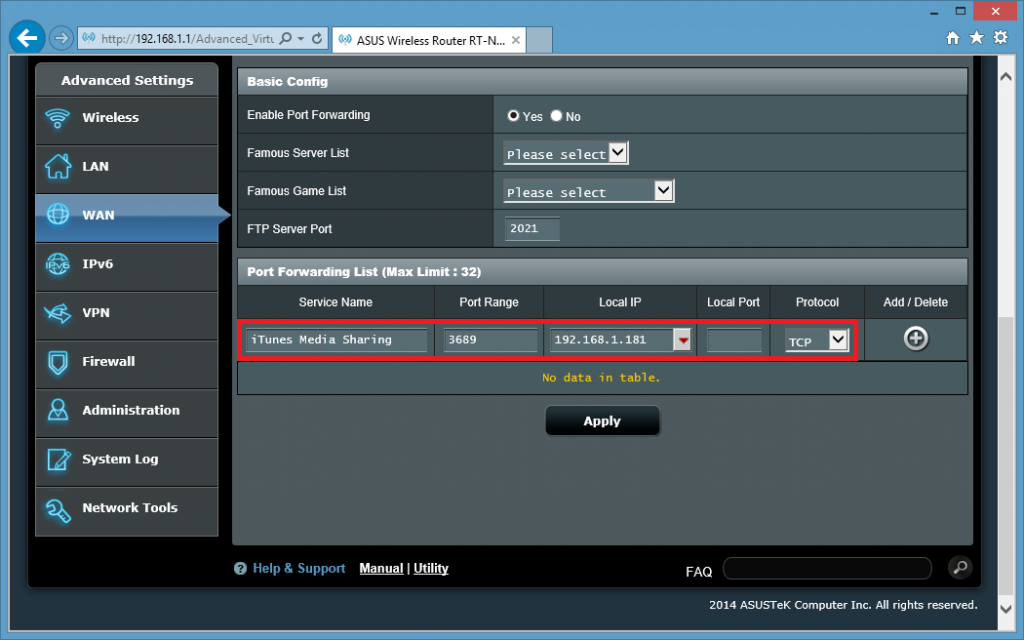
Once you’re inside is where we part ways. Nearly every router has a different user interface from other routers, so while the functionality will be more or less the same across the board, expect the appearance of your router’s configuration to be wildly different than pictured below. Again, refer to portforward.com for their extensive router index complete with detailed screenshots. If all else fails, dig through the menus yourself until you find the section for port forwarding. From here, everything is about as straightforward as can be.
Fill in the IP Address field with the local IP address of the device you want to forward the port to, effectively giving the outside world direct access to it as if it had a public IP address. For the port field choose TCP, UDP, or both depending on the needs of the application you’re trying to forward, and then fill in the ports as prescribed. Some routers may require a range of ports here even when only one is needed. In that case, try either leaving the second field blank or inputting the same value twice. Again, every router is different.
With the local IP address and port(s) filled in, give the port forwarding operation a name and you’re ready to save changes and start forwarding ports. As a test, visit canyouseeme.org and input a newly-opened port. If all goes well, the site will return a message confirming that the port is open. Unfortunately though, not all ISPs allow port forwarding these days. If all you get is an error message saying the port could not be reached, and you’re absolutely sure your router configuration is correct, you may have to contact your ISP to confirm that the forwarding operation is even allowed. If it is, they should be able to get the issue sorted from there.
Have a burning question about port forwarding that wasn’t answered in this tutorial? Experiencing issues following it? Sound off in the comments below!
