With Windows 10 mere days away as a free upgrade for the majority of consumer Windows 7 and 8 users, many have found their excitement for the latest version of Microsoft's OS hampered somewhat by the news that out of the box further updates will be forced. As in, without asking for your permission first, all updates to Windows 10 and (optionally) Windows-related software and services will download, install, and even reboot your PC if necessary. Good news? Hardly. While the word 'update' sounds like a good thing and it makes sense that Microsoft doesn't want their OS to fragment among their userbase, it can be pretty inconvenient to be in the middle of work or play and suddenly have your PC take the reigns to do its thing. Worse, if you're a frequent user of Windows' hibernate feature, you'll find that your PC turns itself on when it needs to update and freezes on BIOS-based motherboards due to the updated session mismatching the session you saved when the PC went into hibernate.
Harrowing stuff. But this is still the PC, and where there's a will to customize the experience, there's usually a way. And as it turns out, there's actually a pretty easy way to disable forced updates in Windows 10 and return to the more convenient update options of Windows 7 and 8. Here's how:
Step 1: Open Windows 10's Group Policy Editor
While you might not be aware of its existence, Windows' Group Policy Editor has been around well over a decade and serves to tweak internal Windows settings usually not fully exposed to end-users. The idea is to give administrators of businesses or large networks the ability to restrict certain Windows functionality to only what they need or allow employees of different offices to handle, but as it turns out it's built in to home editions of Windows too.
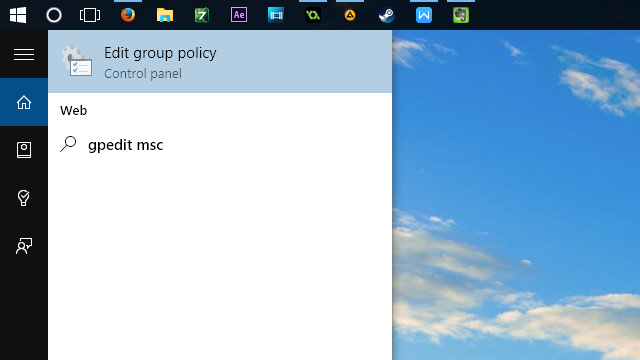
To launch it, you have a few options. The easiest is to simply hit Win + S to pop up the Windows 10 search menu and type in 'gpedit.msc' and select 'Edit Group Policy' in the search results. Using Win + R to bring up a 'Run' prompt has a basically identical effect, or you can simply open your start menu and begin typing.
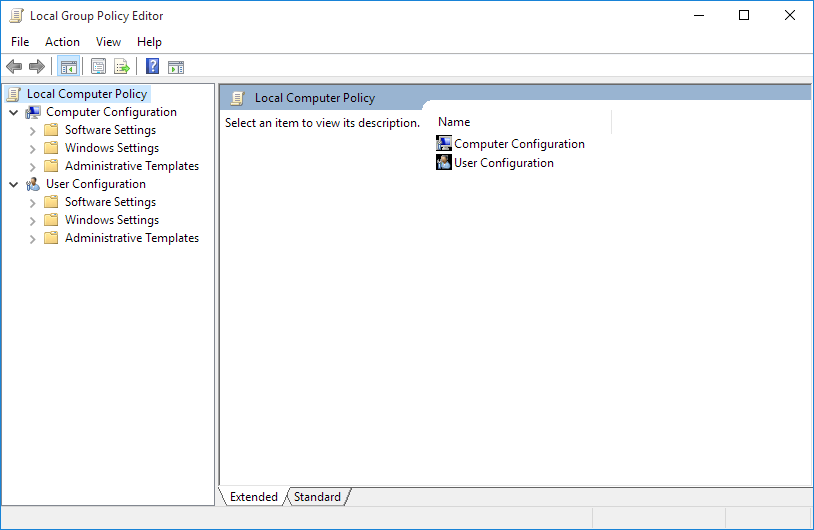
However you launch the Group Policy Editor, this is what you'll get in the end. Warning: what do you from here has the potential to screw up your operating system--not by following this guide of course, but don't go exploring unless you know what you're getting into and are comfortable with undoing your own mistakes.
Step 2: Locate the Windows Update Settings in the Group Policy Editor
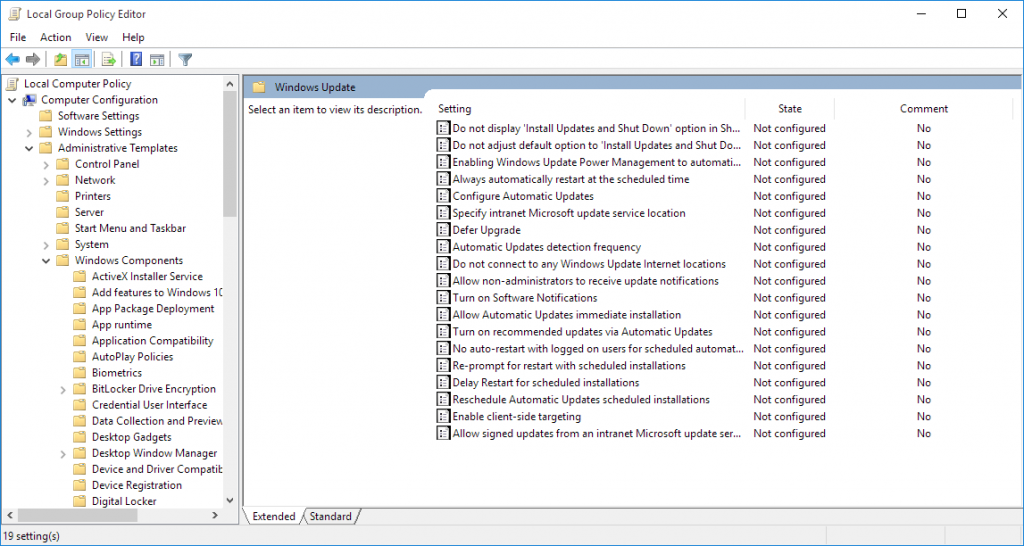
Has this tutorial been easy so far? Good, because this step isn't about to get any harder. Using the left panel of the Group Policy Editor Window, navigate to 'Computer Configuration' > 'Administrative Templates' > 'Windows Components' > 'Windows Update'. Once there, you'll see a screen like this:
No sweat, right?
Step 3: Reconfigure Windows Update Settings
Ok, so maybe seeing a wall of strange text gets you a little nervous after all. But don't worry, there's only three options here we need to worry about, and adjusting them is as simple as making a few clicks.
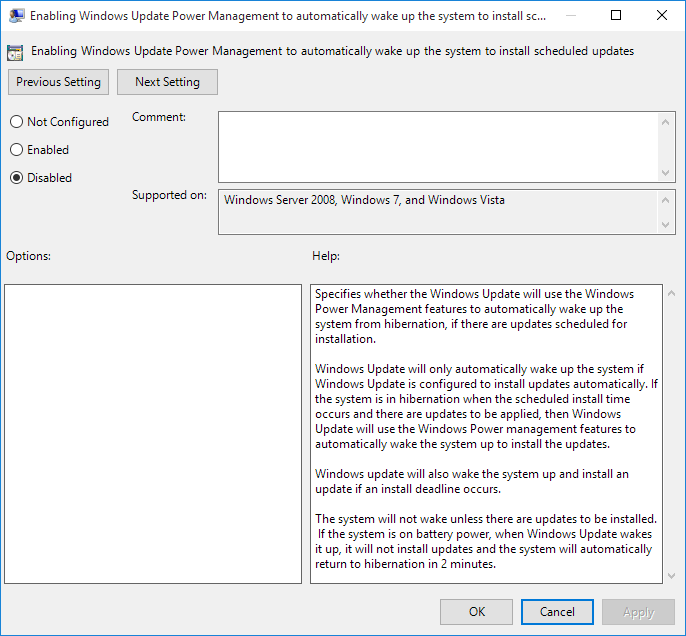
First, to disable your PC waking itself up from sleep or hibernate to perform updates, double click on the item in your Group Policy Editor labeled (appropriately enough) 'Enabling Windows Update Power Management to automatically wake up the system to install scheduled updates'. This will open a window explaining in detail what the option does and what behavior it's currently set to. There are only three options, and they're pretty straightforward: 'Enabled', 'Disabled', and 'Not Configured'. That last option varies from item to item, defaulting to either 'Enabled' or 'Disabled' as Microsoft intends it. In this case, Microsoft enables waking your PC up to perform updates by default, so 'Not Configured' is as good as 'Enabled'. If you're following the logic, that means the only option left to get different behavior is 'Disabled', which will--you guessed it--not wake up your PC to perform updates. Check the 'Disabled' radio button, and with the setting changed, click 'Apply' or 'OK' to finalize the change.
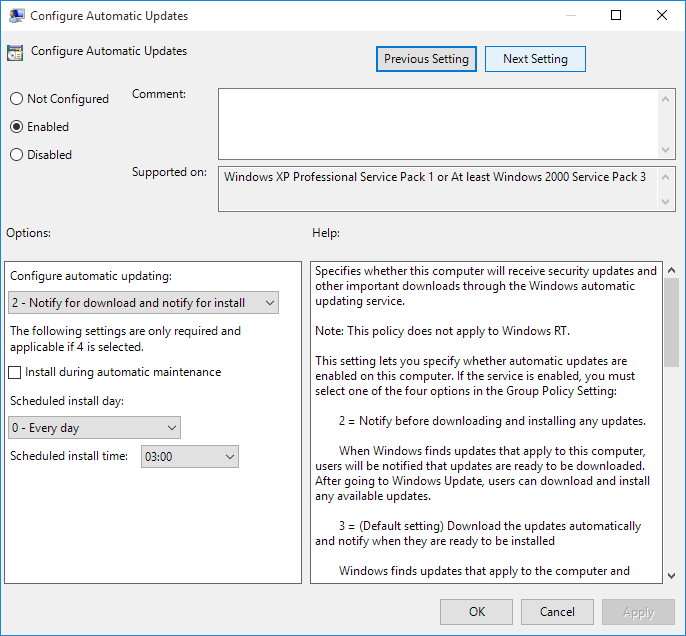
The next item on the list is where things get really interesting. Double-click on the 'Configure Automatic Updates' item and check the 'Enabled' radio button, but don't close the window out just yet. This particular item has a secondary setting allowing for a small variety of update preferences, just like past versions of Windows. These are:
2 - Notify for download and notify for install (Windows gives you notifications when updates are available and lets you decide when/whether to install them)
3 - Auto download and notify for install (Windows downloads updates as soon as they are available but waits for you to tell it to install them)
4 - Auto download and schedule the install (Windows downloads updates as soon as they are available but doesn't install them until a set date/time)
5 - Allow local admin to choose setting (the above options will be made available in the standard Windows Update section of the control panel)
In case you're wondering, no, there's no option 1. In addition, if you choose option 4, you will also need to set the desired date and time in the box below, in the same configuration window. Also, while 5 might sound ideal, it doesn't appear to take effect in Windows 10's new system settings menu, so that leaves only options 2, 3, and 4. Of those available options I recommend using 2 for maximum control, but it's entirely up to you.
The final setting to worry about is the item labeled 'No auto-restart with logged on users for scheduled automatic updates installations'. From the main Group Policy Editor window double-click on this item and simply set it to 'Enabled'. This will prevent Windows 10 from forcing a reboot if/when any automatic or scheduled updates are installed, instead waiting until the user decides to reboot or shut down the PC themselves. Alternatively (or in addition, if you want to really take control), edit the 'Delay restart for scheduled installations', set it to 'Enabled' and specify the length of time in minutes you want Windows 10 to wait before going ahead with the update installations automatically. Note that if you aren't using option 4 above neither of these settings is really necessary, but it doesn't hurt to configure them anyway in case you want to change Windows Update policy later but still avoid forced reboots.
Step 4: Reboot to apply changes, you're done!
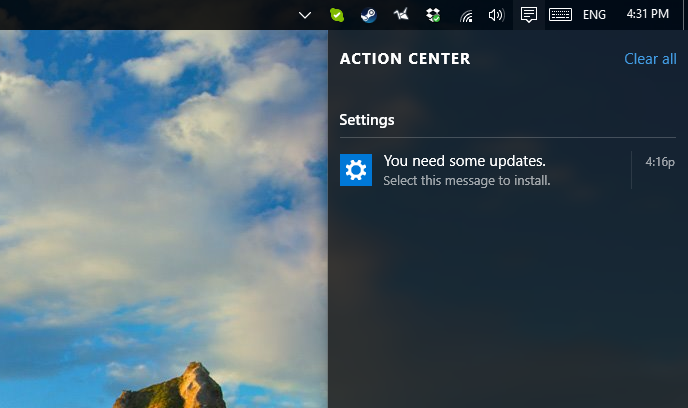
...Because a reboot is always recommended just to make sure changes to the core Windows operating system are properly applied. From here on out, all you'll need to worry about is keeping an eye on Windows 10's new notification center. Rather than get forced updates, you'll get this friendly little notification instead:
It's possible Microsoft will eventually phase out support for even this level of control over Windows Updates, but it seems rather unlikely. Remember, these settings are here for system administrators, and that crowd won't be relinquishing control to Microsoft any time soon, not to mention this is exactly the sort of decision I could see Microsoft actually backtracking on in a future Windows 10 update, at which point this trick won't even be necessary. But for as long as it is, now you know how it's done. That wasn't so bad, was it?

