Is your Android device rooted? If so, then you’ve got access to a relatively under-publicized feature of Google’s popular OS: the boot screen animation. Contrary to what you might expect, this boot animation is extremely versatile and it’s completely safe to tinker with as well. The worst thing that can happen is you get a blank screen instead of the animation you desire, but the device will boot normally in the background all the same. And the best thing that can happen is you get a snazzy new boot screen to smile at every time you turn on your device for the day, and that’s worth the ‘risk’, right? If that sounds interesting to you, then proceed on with the tutorial below.
What you’ll need
• A rooted Android device
• A file manager capable of accessing the root file structure (ES File Explorer recommended)
• An image editor capable of rendering animations (Adobe software is especially suited for this, but there are free alternatives) OR a premade boot animation (available through various sources)
• A .ZIP file manager (7-zip recommended; not necessary for installing premade boot screens)
Once you’ve gotten all that together, we can move on to the fun stuff.
1 – Prep Work
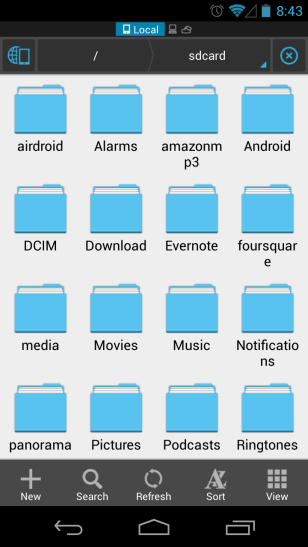 If this is your first time using ES File Explorer or simply your first time using it for root tasks, you’ll need to give it the appropriate permission before it will mess with the root filesystem. Doing so is quite painless: tap on the globe/phone icon on the top left of the app interface, expand the ‘Tools’ menu, and then turn on the ‘Root Explorer’ function. Next tap on the ‘Root Explorer’ text itself and a popup will appear. From the popup list choose Mount R/W, and then set paths ‘/’ and ‘/system/ from ‘RO’ to ‘RW’. Then hit OK and you’re all set. If at any time during this process you are prompted to grant ES File Explorer root access, always be sure to allow the action.
Next you’ll want to navigate ES File Explorer to the /system/media folder (tap the path at the top of the screen, choose “/ Device” in the dropdown menu, open the ‘system’ folder, open the ‘media’ folder) where you’ll find a file called “bootanimation.zip”. As you can probably guess, this file is where all the magic happens regarding making your own boot screen. As such it’s a good idea to make a backup, so tap and hold on the file, then copy/paste it somewhere safe that will be easy to find should something go wrong and you decide just to put the original file back in its place. Again, you need not fear breaking your device with this file, but backups are always a good idea just the same.
Not finding bootanimation.zip at that location? Certain devices may also store it in /data/local/ or /system/customize/resource/, so look around before giving up.
2 – Transfer, Extract
If you’re using a premade bootanimation.zip, you may skip this step. If you’re making your own on the other hand, it’s a good idea to transfer bootanimation.zip from your device to your PC. Copy it to your /sdcard folder, which is readable by Windows/Mac/Linux over USB, bluetooth it, email it–whatever suits your fancy. ES File Explorer provides a wealth of options via the ‘Share’ button in the ‘More’ menu which appears when a file is selected. This step is not strictly necessary, but it provides a good template to work with.
At any rate, once your bootanimation.zip is on your PC’s hard drive, extract the file and open its contents. Depending on the device you’re using there may be lots of folders or just one or two. But don’t be intimidated, because what’s actually going on here is a lot simpler than it looks.
3 – Create Your Animation (+some explanation)
If you want to stick to your extracted template (which is a good idea primarily because you can guarantee that you’ll see all of your boot screen but not too much, since the length is designed to work with your phone/tablet’s boot speed) then open up the folders containing the animation and take note of how many images there are.
Yes, images. Android boot animations are not videos, but rather series of images whose names are numbered so they will ‘play’ in order. The folders segregate these sequences of images so that a) entire sequences can play in a specific order, and b) certain sequences can play once and be done, while others can loop until the device is finished booting. We’ll get into exactly how Android knows how to handle each folder in a bit.
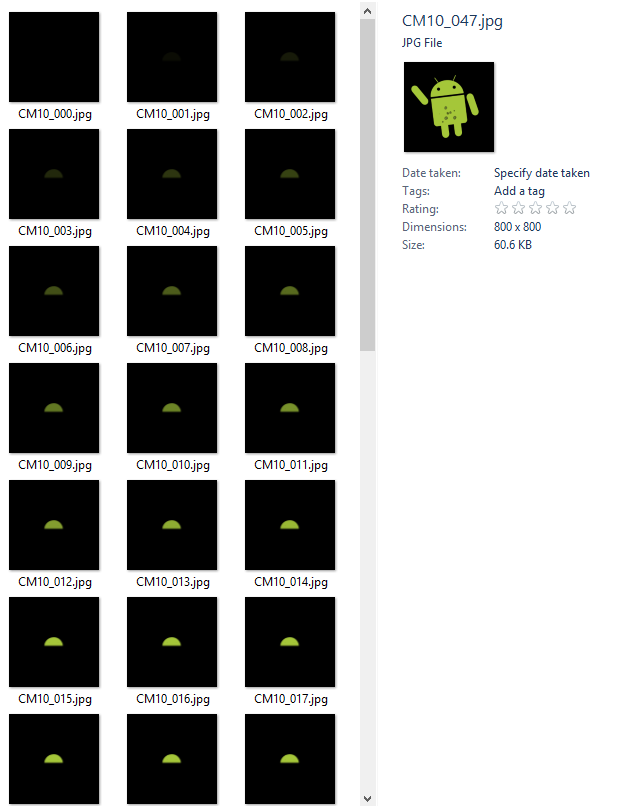 Once you have an idea of how many frames to make your animation, get into your image editor of choice and make your animation accordingly. Note that most boot animations play at 24 frames per second, so yours should too–though there is a bit of flexibility here, so don’t worry if you accidentally use a different framerate instead. Resolution is also flexible, but it’s a good idea to keep it within the bounds of your device’s screen resolution. Your images can be a square or rectangular and they don’t have to fill the entire screen, but keep in mind that anything smaller than full-res will just get centered and letterboxed. Also keep in mind that your boot screen should probably loop at some point, so make sure to design the last several frames to play seamlessly back to back.
When you’re all done designing, render out the project as JPG images (PNG is also supported but generally results in much larger files–thus high quality JPGs are preferable). Where applicable, make sure your JPGs are not set to ‘Progressive’, or your PNGs not set to ‘Interlaced’. Progressive/interlaced files are unnecessarily large and can create problems in the boot animation, as they are designed for web use. And again, the filename should be numbered on each frame to make sure everything stays in order. Most programs capable of exporting JPG sequences will do this by default. If your software only exports to video, not images, then there’s lots of free converters at your disposal. A good open-source option is FFMPEG.
4 – Organize
Now to get those sequences worked out. If you’re still sticking to a template, just overwrite the old files with the new ones in each folder. Otherwise, create a folder named “part0″ (or whatever you like, so long as there are no spaces) and drop in there all the frames of your animation except the frames designed to loop. Then make another folder named “part1″ (or again, whatever you like) and drop in just the looping frames. If your animation consists of multiple sequences, repeat this process for each. The key is simply to segregate single animations from looping ones.
5 – Desc.txt
Now for the key to this whole operation: “desc.txt”. This file describes to your device how to handle all the images and folders you’ve just created. Again, if you stuck to your template then there’s not much to do here. But for totally original animations, you’re going to need to get a bit more creative. ‘desc.txt’ needs to exist alongside your ‘part0’/’part1’/etc folders, so create one there if you’re starting from scratch. For reference, here’s an example ‘desc.txt’ and how it works:
800 800 24
p 1 0 part0
p 0 0 part1
The first line (800 800 24) describes your images’ dimensions and the framerate at which they will be played. The first ‘800‘ is the width, and–you guessed it–the second ‘800‘ is the height. Of course these are portrait dimensions though, so if you’ve got a full HD display that you want to entirely fill with animation, you’d enter ‘1080 1920‘, not the other way around as you’re probably used to. And as was already mentioned, the ‘24‘ defines the framerate. For best results this should be set to the same speed as you designed the animation in, whether that be 24, 30 or otherwise.
The next two lines define a single sequence in two parts. Thus the ‘p‘: "part". After ‘p‘ is the number defining how many times through to play that part of the animation. In most cases this will be either 1 or 0: 1 being ‘once‘ and 0 being ‘infinite‘. However you’re free to use 2 and beyond to your liking. After the number of plays comes another number, this time defining how long to pause at the end of the animation. This number can be 0 for no pause, and anything higher for a specific pause in milliseconds. After all that we have the name of the folder containing our frames.
So with all that in mind, here’s how Android reads the example ‘desc.txt’ above: “Interpret the frames as being 800 pixels wide and 800 pixels tall, and play them at 24 frames per second. The first part should be played 1 time with 0 milliseconds’ pause and the source frames exist in a folder named ‘part0′. The second part should be played infinitely with 0 milliseconds’ pause and the source frames exist in a folder named ‘part1′.”
Simple enough, right?
6 – Packing it Up
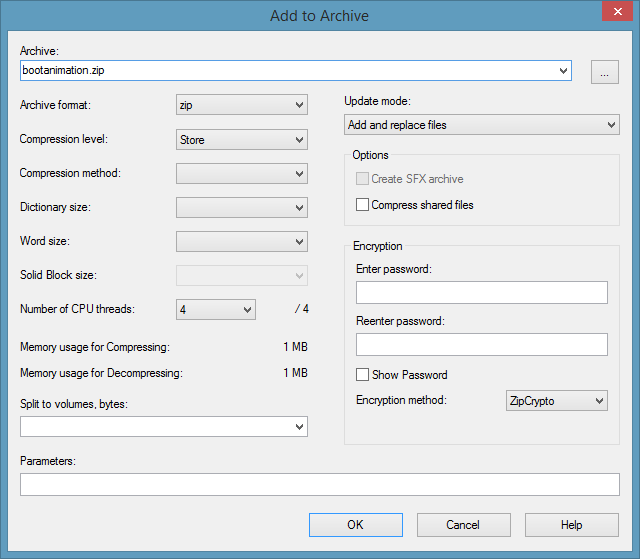
Now that all of our source files are finished, we can finally go about getting them onto an Android device. This is where your .zip handler comes in. The reason why a program like 7-zip is necessary is because “bootanimation.zip” cannot have any actual compression, or else Android will not read it. Instead the .zip format is simply used as a container, to keep files neat and organized. So in your PC’s file browser, highlight your ‘part#’ folders and ‘desc.txt’ and choose “7-Zip”, “Add to archive…” from the context menu (aka right-click menu). In the window that pops up you’ll simply need to set ‘Archive’ to ‘bootanimation.zip’, ‘Archive format’ to ‘zip’ and ‘Compression level’ to ‘Store’. Then hit OK and the file will be created.
7 – Installing it on Android
Now it’s time to get back in to ES File Explorer. Transfer your newly created ‘bootanimation.zip’ to your device by any means you wish, and use your root-worthy file browser to copy and paste it over the original, most likely located in /system/media. Once ES File Explorer confirms that the overwrite completed successfully, you’re ready to reboot your device and have a look at your shiny new boot screen!
8 – Notes…
-You can stick a brief MP3 into your ‘bootanimation.zip’ if you want to hear your device booting up as well as see it.
-Not all ROMs are created equal, especially stock ones. Depending on your manufacturer, changing the boot animation could be anywhere from easy to impossible. In the latter case, you’ll have to use a custom ROM, such as the famous CyanogenMod, in order to use custom boot animations.
-If all this seems a little intimidating to you, there are a few apps on the Google Play store which will happily try to change your boot animation for you. Sometimes they will even offer conversion to and from GIF to simplify the process of making your own animations. However, you’ll have much greater freedom and get much higher quality boot screens handling the process manually.
9 – My Bootscreen…Just for You
Want Google’s happy little green guy greeting you every time you turn on your device? Well, then my own custom boot animation is just the thing for you.

Click here to download the above animation as a boot screen! (open link, hit Ctrl + S or ‘File’, ‘Download’)

