
2025 has proven to be the best of times and the worst of times for gamers. While AI and live service shenanigans usher in worse products at higher prices, some truly cool tech has still managed to hit the market. Buried somewhere in my Reddit comment history nearly a decade ago, I once predicted that handheld PCs would be the spiritual successor to the PlayStation Vita, that devoid of a second form factor, Sony would publish their games on PC, and that Halo would arrive on PlayStation in some form before the end of the next generation. All of those things have now come true, which means that a theme of the year has been consumers discovering what's possible with devices they may not have considered before.
One such device is the eGPU. Once a bulky, clunky desk accessory not much smaller than a PC itself, modern eGPUs have taken the world by storm as companions to handheld PCs, leveraging discrete laptop GPUs for tiny form factors while still maintaining a high level of performance. The Morefine G1, for instance, includes SKUs going all the way up to an RTX 4090M with 16GB VRAM. Although cut down from its desktop counterpart, the mobile 4090 can still achieve performance similar to a desktop RTX 4080 (with high-bandwidth interfaces like Oculink or Thunderbolt 5), but in a package that literally fits in the palm of my hand. It's seriously impressive stuff, and makes going desktop-free truly viable for high-end gaming for the first time.
There's just one problem: as with early handheld PCs themselves, this new wave of eGPUs is being developed independently, without support from vendors like NVIDIA, AMD, or Intel. GPUs are often being harvested from dead laptop motherboards (which is great for the environment!) and placed in a form factor they were never meant to operate, meaning official drivers won't recognize them. This puts consumers at a huge risk, as updated custom drivers from the eGPU manufacturer may be delayed or absent entirely. This is especially important in cases where new drivers solve major bugs or security issues, not to mention keeping pace with the latest games.
But what if I told you that you don't have to wait, and a tool already exists which can produce custom drivers for eGPUs like the Morefine G1--or any product with an NVIDIA laptop GPU in a discrete form factor, for that matter?
Here's how it goes:
Step 1: Download NVCleanstall
NVCleanstall is an application developed by TechPowerUp which provides a UI for pulling apart NVIDIA driver packages, modifying their contents, and putting them back together again. It's an excellent tool that saves a ton of work doing manual edits. No installation is necessary, so save it wherever you like on your PC.
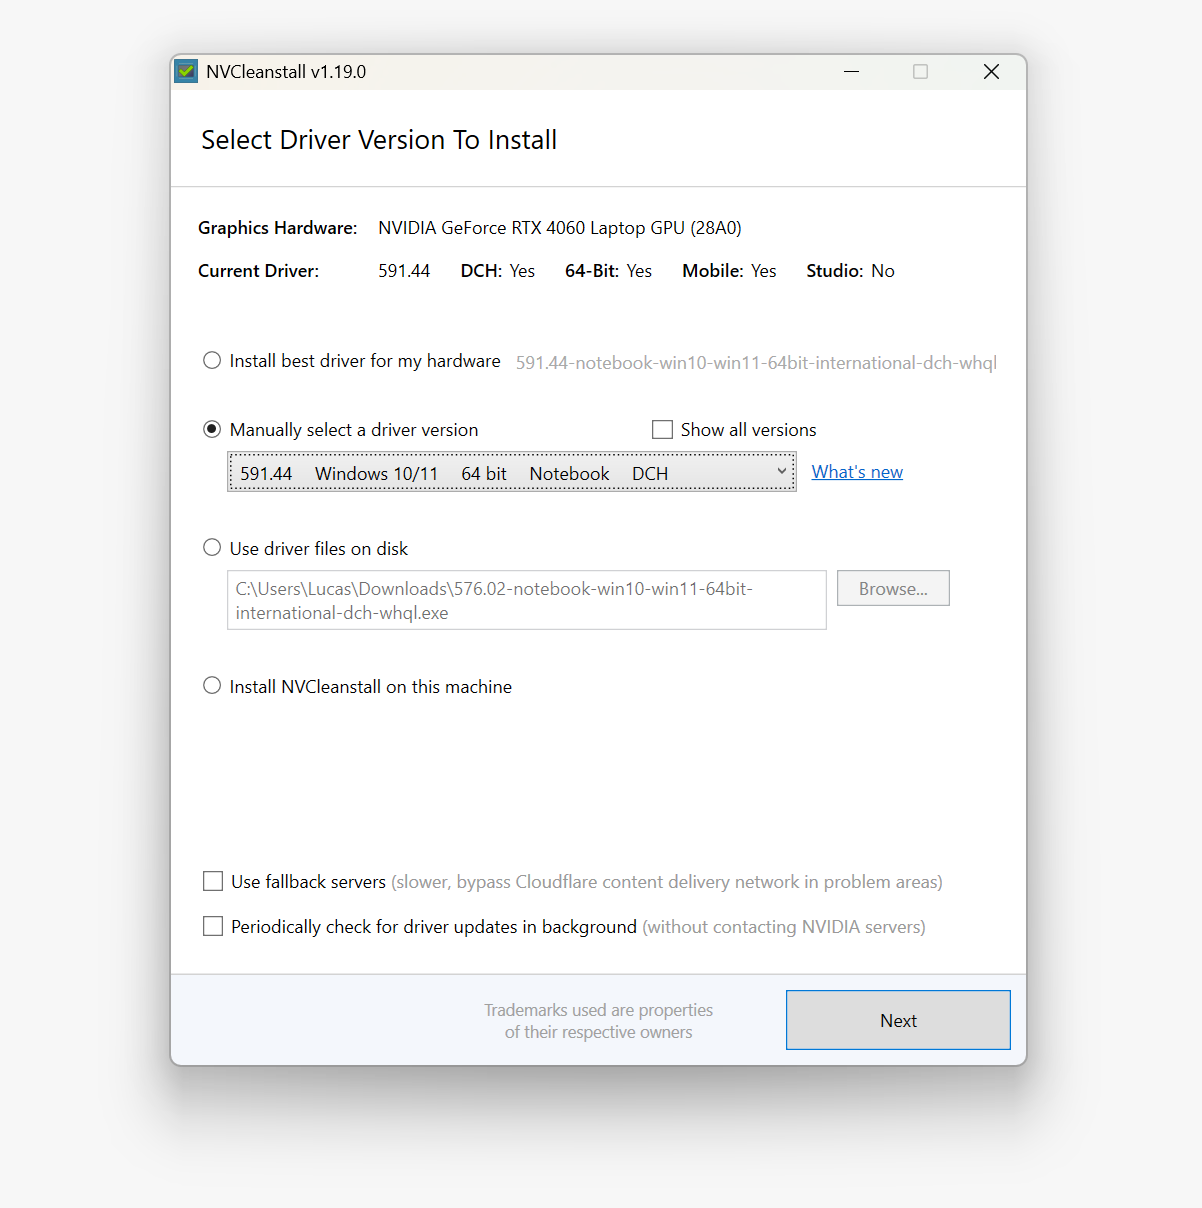
Step 2: Select Base Driver
Open NVCleanstall, and you'll be greeted by the main interface. Here, you'll begin by selecting a driver package to modify. You can use the auto-detected result for your PC, select a driver to download remotely, or use an existing package already located on your PC.
Which driver to use as a base will depend on the device you're trying to support. For the Morefine G1 and similar, the Notebook edition driver is the best place to start.
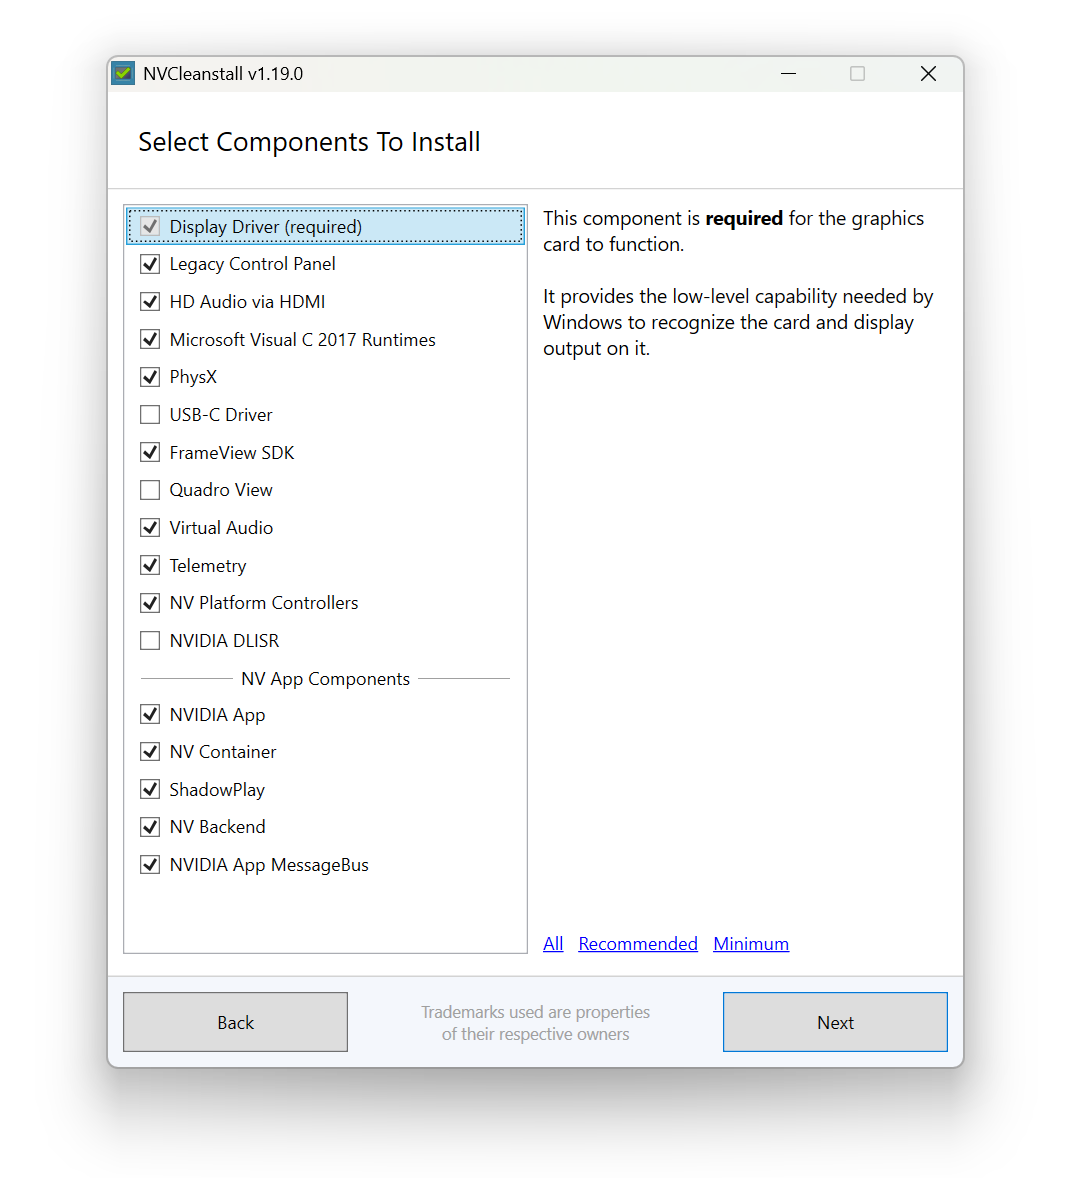
Step 3: Select Driver Features
With a driver selected, you'll next be asked which features to include. This is largely up to you, but for a standard selection of features, you should include everything except the USB-C driver (which was limited to select RTX 2000 cards only), Quadro View, and NVIDIA DLISR.
Step 4: Add Hardware Support
Here comes the most important part: once NVCleanstall has processed the driver package with all selected features enabled, it's time to add support for your custom hardware. Fundamentally, this is possible because the underlying GPU is the same; you only need to point the driver to where the GPU is physically located--that is, behind a custom interface.
Fortunately, no guesswork is required here, because Windows tells you exactly where the GPU is!
First, open Device Manager from your Windows Start menu and find the GPU in the list of devices. Right-click it and open the device properties, then switch to the Details tab. From here, select Hardware IDs in the dropdown menu to see the physical device address.
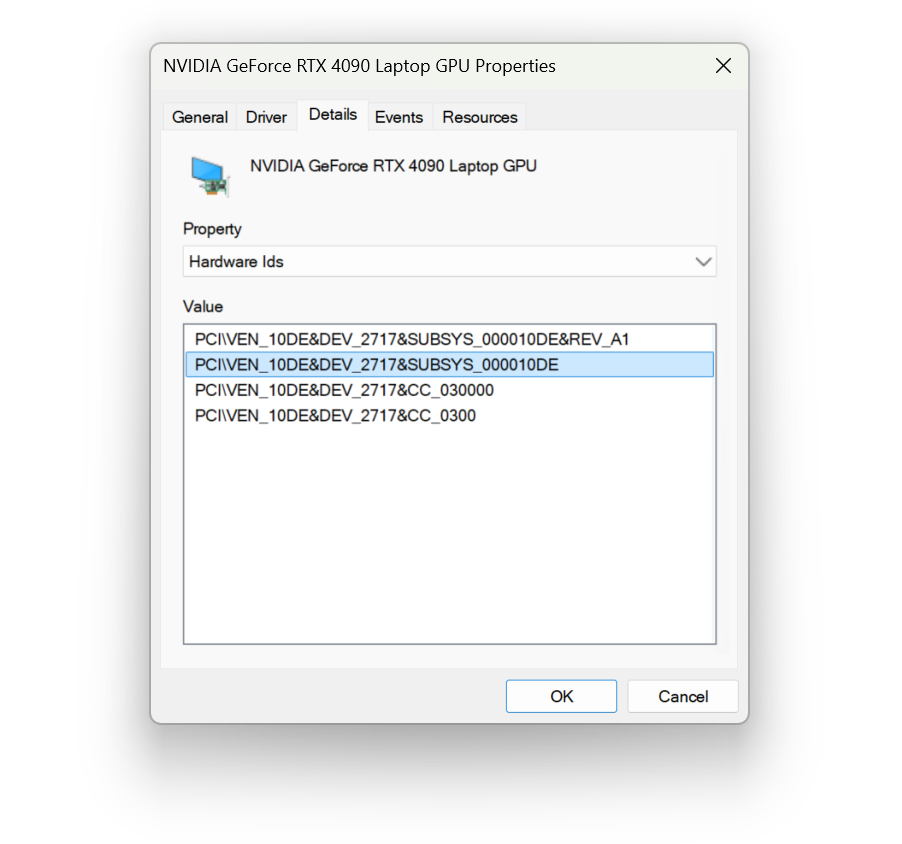
You will most likely want the first or second entry in the list, which shows the vendor ID (VEN), device ID (DEV), and subsystem ID (SUBSYS). (If your hardware has a revision ID (REV), you can ignore it for the purposes of this guide.)
Next, return to NVCleanstall and enable Add custom hardware support. Select an equivalent GPU from the dropdown list of templates, making sure to match the device ID in the template with your device ID. NVCleanstall will prepopulate a portion of the custom hardware ID, which you simply need to complete with the value from Device Manager.
As an aside, you'll notice there are multiple templates for the same GPU, each corresponding to a different "nvxxx.inf" file. This is because each "xxx" corresponds to an official OEM (e.g. Asus, HP, Dell, etc.). Which one you select is typically inconsequential, but for best results, you can try to match your template with your PC brand (if any). This can be a bit tricky, but for the determined, navigate to C:\Windows\Temp\NVCleanstall\Display.Driver and sort by file type to see all *.inf files referenced by NVIDIA Cleanstall. Then, open a file and locate the [Manufacturer] line. Here, you'll see many hardware IDs similar to the one for your GPU. Grab any ID and run a Google search on it. Chances are, the associated OEM will appear in the top results.
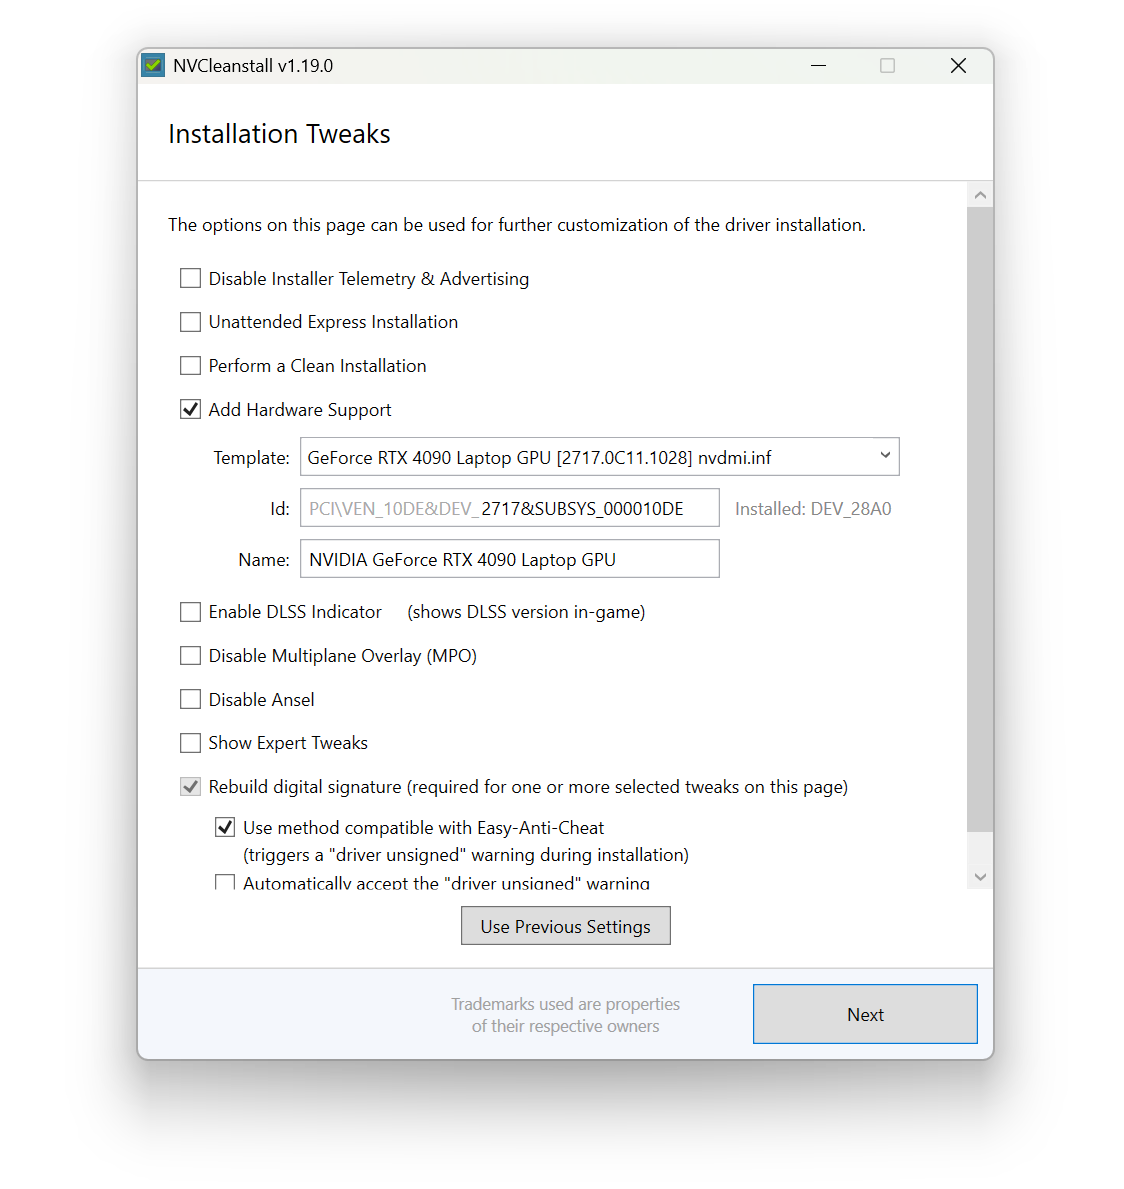
Next, give your custom hardware an appropriate name, and ensure both Rebuild digital signature and Use method compatible with Easy-Anti-Cheat are enabled. This is critical to avoid false positives in online multiplayer anti-cheat systems flagging your system based on modified GPU drivers, but as NVCleanstall notes, you will receive a scary-looking prompt during driver installation as a consequence. You can enable a third setting to automatically accept this warning prompt for a more user-friendly presentation, but in my experience, the feature does not always work, and seeing a warning briefly appear and then self-close is more disconcerting than interacting with it myself.
Step 5: Build Driver Package
With your custom hardware and feature preferences in place, click Next to reach the final step: building your custom driver package! Technically, you could install the driver directly, but then you'd lose your work after closing NVCleanstall. My recommendation would be to simply build it and store it in a safe place, especially if you plan on using multiple devices with the same eGPU.
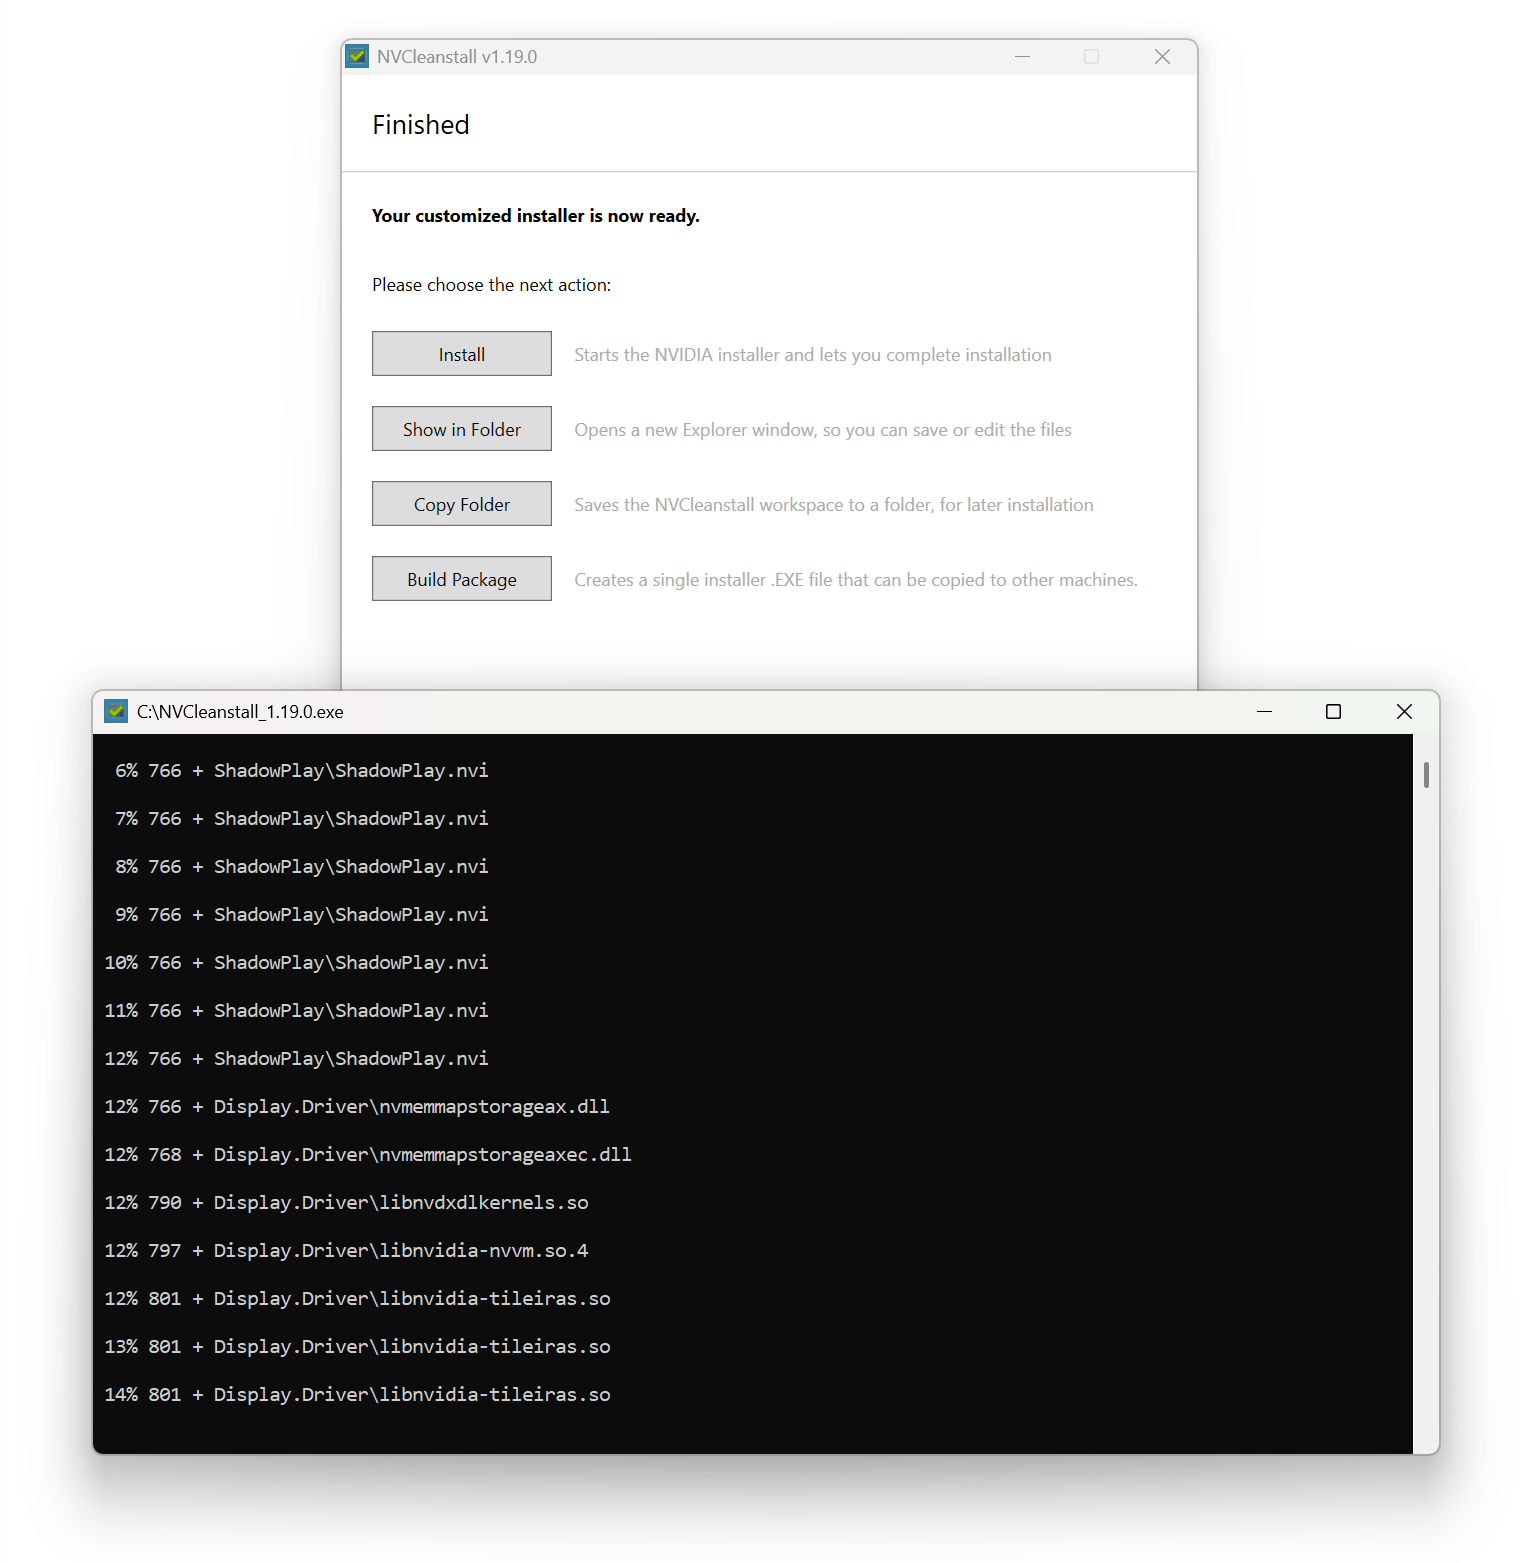
Step 6: Install driver
And... that's it! Let NVCleanstall finish, then run your custom driver installer like you would an official update.
Happy gaming!

 Windows 10/11 Patches Guide")


